Help Library
How to Create and Use Workflows
Modified on: Wed, 9 Mar, 2022 at 12:09 PM
This is an overview of the workflow builder. The workflow builder is a visual builder feature that allows you to combine trigger and campaign type features with some added functionality.
Step 1: Access the Workflow Dashboard
Navigate to workflows, you'll end up on this Workflow Dashboard page. Here you’ll see drafted and published workflows.
You can Create a New workflow using the green button at the top.
You can also edit, delete, or copy existing workflows using the icons on the right side under “Actions”.
Additionally, you can click through multiple pages if you have several workflows.
Step 2: Create a Workflow and Navigate through the Builder
Click the +Create New Workflow button in the top right of the screen.
Choose an option for the type of Workflow you wish to create. You can import events from an existing campaign, start a workflow from scratch, or choose from preexisting ‘recipes’ or templates.
Click the +Create New Workflow button in the top right of the screen again, to enter the builder.
In the Workflow Builder, you can rename a workflow using the pencil icon next to the title.
By default, you’ll be on the Actions page. You can click to toggle between Actions, Settings, History, and Status tabs. (We’ll explain each tab in a separate tutorial.)
Add your trigger(s) and create your workflow. You can have multiple triggers fire off the same chain of events.
In the top right, you can click the “Test Workflow” button. Save any changes, and then toggle the Workflow from Draft to Publish mode to activate it.
Step 3: Customising Your Workflow Triggers
Click the Add New Workflow Trigger in the grey box at the top of the builder.
Choose the Trigger type, and customise any needed filters.
Click Save and the trigger will be added to your workflow.
Note: a benefit of the Workflow feature is that you can have multiple triggers fire off the same sequence of events.
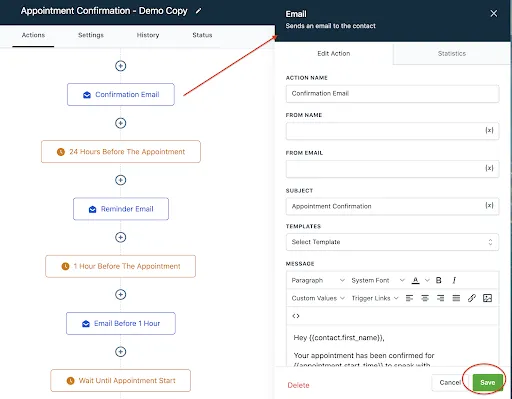
Step 4: Customising Your Workflow Actions
Click the + to add a new event to the workflow. Choose and customize the action in the menu on the right.
Save to confirm the changes.
You can also click into an existing event to update it. Be sure to save any changes you make.
Note: the If/Else workflow condition is a new feature which allows you to take different paths, or chains of events, depending on specific conditions within the workflow. You can specify the path based on contact details, date/time, contact reply, or trigger, you can set up the various paths. For example, you may want the workflow to send people from a certain company down one path, and people from another company down another path. You can further customise the if/else conditions to include several filters if you wish.